Showing posts with label eco-friendly. Show all posts

Friday, October 26, 2012

DIY Junk Mail Cork Coasters

I came up with this project because I have so much cork scraps and my favorite material to upcycle with is junk mail!  It's so plentiful and I like revealing it's inner beauty, literally.  Here's an easy coasters project! 


{ Materials needed }    

{ Instructions }
  1. Cut junk mail with patterns into 4x4" squares to fit your cork squares.  Place on adhesive side of cork.
  2. Paint whatever pattern you'd like onto junk mail paper.
  3. Seal it with mod podge hard coat (purple bottle).  I chose this one because it is a non-toxic, waterproof sealant since we will be putting cold drinks on these coasters after all.  
I plan to add these packs of handmade coasters to Christmas wine baskets this year!


Happy upcycling!

Monday, October 8, 2012

12 Days of Christmas For Your Guy

I know it is early but for someone who DIY's it is crunch time for Christmas already!  I don't know how others do it but starting early is the only way to give myself time to make meaningful gifts for everyone on my list.  So this is the reason why I'm sharing this post now because I'm already in my brainstorming mode.

Last year I decided to do 12 days of Christmas for Sutty.  Knowing him, I numbered the gifts clearly so that he would open them correctly and what does he do?  Opens two gifts on the first day!  Men still act like boys sometimes, anyone agree with me?  This guy is 26 yet would go to the tree first thing in the morning to find his next gift.  I really enjoyed putting this together because it wasn't all just for him... The gifts were a mixture of dates for us to do and only a few actual material items.  I emphasize on spending quality time with each other instead of getting engulfed with material things during the holidays.  My goal was to only give 1-2 normal item gifts and the rest were things we would do anyway while trying to be as economical as possible.


Below is a description of each gift I gave which will hopefully give you some ideas.

Day 1: "Thanks for being a sweetheart."  Wrapped up some candies.  I don't encourage his sweet tooth so I would only give him a few and shared the rest with my coworkers, haha.
Day 2: "Movie date night :)"  You can either do this at home, go out to the theater, or even drive-through.  Gift wrap a bag of popcorn or favorite box of candy.  Microwavable popcorn packets is a good, cheap option.
Day 3: "We're going on an ice skating date Friday night, dress warm!"  I got discounted tickets to a local ice skating rink.  I use Groupon, LivingSocial, and Goldstar but there are so many more out there!  This date was more for myself.


Day 4: Some more candy.
Day 5: Banana Republic Men's Gloves - I wrote a note that said "These should come in handy for tonight's date."  This was our ice skating date night.

Day 6: honestly can't remember what I did here probably more candy... but I'll keep thinking about it.
Day 7: A box of cookies.
Day 8:  "Put this address in for tonight's date." I got discounted tickets to a local Christmas lights wonderland.  I thought it was going to be cheesy but it was surprisingly really fun. Again, I use Groupon, LivingSocial, and Goldstar but there are so many more out there!

Did you notice we can't take serious photos yet?

Day 9:  A candy cane.  I was getting lazy and brought candy canes in for work so left one at home for this guy.
Day 10:  "Pack warm for a weekend in the city!"  We live an hour away from the San Francisco so simply taking a weekend trip up there during the holidays is magical. Plus, Sutty loves to shop so it made it easy for me--Union Square.  I planned ahead and told our friends we'd be coming up.  We enjoyed dinner, went shopping, and then our friends showed up as a surprise to join us for the cable car ride.  It was beautiful at night time with all the city lights.  The cable car drops you off right next to Ghirardelli so we had a delightful late night dessert :)  Oh, I can't tell you how awesome this trip was! 

Day 11:  "You always make my heart melt."  Box of chocolates.
Day 12:  I made cuff links from rare Cambodian coins since his culture is very important to him.  They're subtle and classy.  This cost me around $7.

Here's another version I saw on Pinterest you should check out:
http://www.passionatehomemaking.com/2011/12/on-the-first-day-of-christmas-my-true-love-gave-to-me.html

Please comment if you have additional ideas!  I need to mix a few new ideas this year.

Love,
EcoMonster

Monday, October 1, 2012

DIY Beeswax Candles


I love an excuse to bring out my beeswax candles since they set such a romantic ambiance.  This photo is from my point view, sipping on some chianti while Sutty makes dinner in the background.  We don't do candlelit dinners every night but he does always cook dinner.  We've learned that I struggle in the kitchen and it's just a scene we'd like to avoid and so I get to set the table while he cooks the meals, works for me! :)

DIY Beeswax Candle Kits are available in my shop if you're interested!  Get them in time for the holidays which will be rolling in soon!  This is a very easy project. 

How-to: Beeswax Spiral Taper Candle
1.  Lay beeswax sheet on paper so that it does not stick to your working surface. Your sheet will come as a rectangle sheet, 8" x 16".  To create your spiral taper, cut the rectangle diagonally from one corner to the other so that you get two triangular sheets that looks like so: 


2.  Align wick along edge.  Flush the wick on one end which will be the bottom of your candle and then on the other end let it exceed the candle about 1 inch so that this will be the top of the candle.  


3.  Fold end of beeswax sheet over the wick.  Tuck it around wick to achieve a round basis for rolling the rest of the way. Work slowly to prevent cracking and breaking.  You can use a hair blow-dryer to warm up your sheet but don’t over heat it.


4.     Once you’ve reach the end of your sheet, press edges to flush to candle.


I use a collection of vintage and recycled glass bottles as my candle holders.  I place kraft paper on the table so that clean up is easy.  They're so beautiful and smell wonderful!  Get your kits here!


Happy candle rolling!
-EcoMonster

Sunday, September 9, 2012

Egg Shell Candle Tutorial

Earth911 saw my egg candles on my Flickr account and asked for me to create a tutorial for their blog, uh yes!  Way to motivate me to finally get this tutorial together.  

Let's get started!

Supplies Needed:

a. Candle thermometer 
b. Clean, empty egg shells
c. Old pot for boiling water
d. Wick (or old birthday cake candles)
e. Used candles (once melted, you can also reuse the wicks)
f. Melting pour pot 


You can probably find most of these materials around the house, but you may want to head to your local crafts store for the candle thermometer and melting pour pot. in handy for candle crafts for years to come.


You have three different wick options. Brand new wire wicks can be purchased from your local crafts store. But I recommend recycling old birthday candles or wicks from used candles to cut back on environmental impact. 

You can salvage wicks when melting down old candles: Once candle wax is melted, simply extract the wick from the melting pot using tongs or a skewer.
Next time you're scrambling eggs, remember to salvage your egg shells for use in your candle project. 

Start by cracking the top of each egg with a spoon. Break shell away carefully until the hole is large enough to pour content out. 

Rinse your eggshells using hot water, and run your finger around the inside of the egg to remove any remaining shell pieces. 

Let them dry, and they're ready for crafting!
I repurposed wax from old, un-burnable candles for this reuse project. 

Reusing old candle wax is a great way to cut back on waste, but it can be tricky if you don't know what you're doing. So, keep these safety tips in mind while working on your project. 

>> Firstly, candle wax is flammable. This includes parrafin wax, soy wax and beeswax. So, do not use direct heat to melt your candles. Keep flammable items away from the stove, and never leave melting wax unattended. 

On the off-chance that the wax does catch fire, do not douse it with water. Keep a fire extinguisher or baking soda handy, and reach for one of these instead to avoid a crafting mishap.

Cover your workplace with newspaper for easy clean-up - since wax is not fun to clean off counters,.

To begin melting your wax, boil water in an old pot or saucepan and place the melting pot inside. 

Add used candles to the double-boiler setup, and heat to between 125 and 150 degrees Farenheit. 

Check the temperature frequently with a candle thermometer, and never leave wax unattended. 

Tip: Don't let your mixture get hotter than 250 degrees Farenheit or the vapors could become flammable.
Trying to fill your egg shells with wax all in one pour could yield less-than-perfect candles so I do two pours to give the candles a smooth surface.

For the first time around, pour melted wax into eggshells about three-fourths of the way.
Allow your candle wax to cool for 10 to 15 minutes. Once the wax has slightly hardened, gently insert wicks into the center of your egg shell candles. 

Before moving on to the next step, your wax should be soft yet thick enough to hold up the wick by itself.
The first pour will create a concave around the wick. So, a second pouring will fix this. 

Top your candles off with more melted wax, enough to create a smooth surface.
Allow your candles to set for at least two hours before using.
Float them in a bowl of water or use egg candle holders.  


Happy upcycling!
EcoMonster

Monday, February 9, 2009

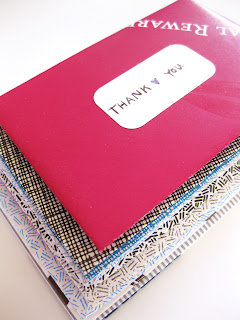
Mini Junk Mail Envelopes

m i n i . j u n k . e n v e l o p e s

my pile of used junk mail envelopes was growing uncontrollably so I had to come up with something. still has the same purpose yet rockin a different look.
perfect for business cards, thank you notes, gift cards, & more.

{recycling process}
Used junk mail envelopes were hand cut into mini envelopes for a 2nd run. This time they're petite & showing off their inner beauty. Salvaged mini white blank labels will be provided. Seal with cute stickers, tape, or glue.

{materials recycled}
junk mail envelopes = paper = wood
mini labels = paper = wood

Tuesday, February 3, 2009

Easy How To Make Envelopes From Magazine


m a g a z i n e . e n v e l o p e s

This is a super-dee-duper easy envelope you can make from old magazines with minimal cutting with means less scraps of paper left over. You just need old magazines, scissors, and tape or other adhesive. I package my items this way most times.

1. Start of with any magazine page. Turn it around, fold the bottom up but leave about an inch for your flap later.
2. Fold the right and left sides in about an inch.
3. Fold your flap down.
4. Open up the page and flatten out.
5. Cut as seen in picture. I cut the corners at an angle which you can also round out.
6. Fold back up and glue or tape the two side flaps down.
7. Fill with goodies and use cute stickers or tape to seal it up and mail it out.

Thursday, January 15, 2009

Organizing Craft Room

Wanted to share some more organizing ideas for your craft room.

Storing Your Ink Pads


This is an old cassette tape holder I purchased at the handy dandy thrift shop which is PERFECT for your ink pads I tell ya. Store your pads upside down to prolong their inkyness. I try to purchase all my craft organizers in wood so that I could paint them all white later. I don't want my future craft room to be looking tacky like it does now!

Handy Dandy Tools


I love this thing. Which was also picked up from the thrift shop. I was thinking how cool it would be to have a craft tool box for things that I'm always misplacing. Like those darn scissors! I went out thinking it'll be a tough find but was mighty lucky and found this perfect wooden caddy.

Knick Knacks


These are Pringle containers that I wrapped with scrap pages from a children's record album. I'm using these two to store dead batteries and ink cartridges to recycle later. I'm sure there are tons of things to fill these guys up with.

Feel free to comment additional sugguestions!
:),
ecomonsters

Monday, December 8, 2008

Mini Cassette Tape Necklace


c a s s e t t e . n e c k l a c e


{info}
3M answering machine cassette tape
chain about 13" in length
100% post consumer recycled necklace

{recycling process}
This cute little cassette was rescued from a lonely 2nd hand shop shelf and turned into a cool retro necklace with misc. metal scraps.

{materials recycled // from}
cassette tape // 2nd hand shop
necklace chain // yard sale
zipper piece // old jacket

Sunday, December 7, 2008

eco address file


e c o . a d d r e s s . w h e e l

{info}
a-z tabs
over 400 recycled cards
2.5" x 4" cards

{recycling process}
This address wheel was rescued from a 2nd hand shop and refilled with over 400 hand cut and hole punched recycled cards. Recycled papers included junk mail, magazine subscription cards, old typewriter paper, etc... The tabs were then embellished with cute a-z stickers (non-recycled though).

{materials recycled // from}
wheel (GBC Bates brand) // 2nd hand shop
paper // various sources

Spread the green message by showing others how easy it is to be eco-friendly.

Sunday, November 16, 2008

Green Organization

It's eco-friendly and cheap! Instead of studying for a midterm I decided to organize and label all my craft supplies, materials, etc... Being a college kid, I definitely don't have the money and it's just not practical since I'll be moving soon to purchase permanent organizers.

Cup Containers for markers, pens, crayons, etc...

These were first used for black light beer pong which worked out really well. Now that they have retired they're living their next purpose as organizers. Labeling them just personally makes putting things back a quicker process.

Shoe Boxes as containers to organize certain supplies and materials. Since I have so many different crafts going on, things get lost really easily. It would be easy to pretty them up by just wrapping the boxes in different types of paper but obviously I'm too lazy to do so and am just happy with them as naked boxes.


Record albums as wall organizers for my recycled paper crafts. I blogged about these last time but I actually sorted them this time and labeled them because I just love everything labeled apparently. Again this awesome idea was from paper and stitch


that's all for now!
toodles,
ecomonsters

Monday, October 27, 2008

Green Organization

recycled organizing project no. 1 - cereal box filers
I found this idea on martha sewart's organizing section and had to try it. these are great for magazines, although you have to search for a big cereal box i think. I'm just using them to store my scrap papers at the moment. You can use so many recycled resources to cover these cereal boxes up. I used a gift bag that I saved from my birthday because it was way too cute and I knew it was going to come in handy.

other fun recycled materials you could use:
sunday comics or plain ole newpaper looks cool
decoupage with comic books or magazine pages
used gift wrapping paper
grocery paper bags and rubber stamp them to make it cute
comment me your ideas

cereal box + cute gift bag = stylish filer
+ =

recycled organizing project no. 2 - record album cover wall organizers
awesome diy by paper and stitch.


here's my own wall below. sorry the pictures are blurry but i'm too lazy to retake them. lol, mine doesn't look organized anymore with all the recycled papers hanging out. i love it since my wall was so bare and being a student it's more efficient to utilize my wall space in my cramped room for ecomonster projects. the great thing was, after i saw the diy i was thinking i should head to the thirft store to purchase some records for this project but instead i got to rescue some off the streets! it was really meant to be because we parked downtown and when we got back to the car, they were litterally dumped behind a shop. that really made my day greener! :)


okay that's it for now. hopefully i'll get to finish other organizing projects when exams are over which feels like never!

toodles!